Showing posts with label Technique. Show all posts

Monday, October 26, 2015

Lovely As a Tree and Wetlands

Happy Monday! Yes, I am back to share a couple of cards I made by using the sponging technique along with stamping over each stamp to add dimension.  I found it on Pinterest and loved the card, so thought I would try it myself.  You can find the original post here, and the Pinterest link here
 
Now I took two sheets of paper cut the width of the card, 5 1/2 and put a few dots of adhesive on them, rubbed my fingers over them to soften the adherence of it and then placed one at the top of the card and one at the bottom to be able to sponge the center. (I think she used sticky notes for the card on Pinterest, regardless same effect.)  I used midnight muse for the sky and mellow moss for the grass.  Leaving the paper on top and bottom, I then stamped the trees in a lighter green, then a little darker green, took the paper off the top and bottom and then stamped the trees in black.  So, so easy.
 
I just love this one layer card and so, so easy.
 
 
I also had to do the inside of the card.

 
And then I decided to do another one with the same technique, just a different stamp set and I loved it even more.  I just love these little birds from the SU Wetlands stamp set.  I actually used the same two pieces of paper for the top and bottom and sponged with crumb cake ink for sand and pool party for the ocean.  Took the bottom paper off and put about a 1/4 inch from the top paper to be able to make a sky line.  Then removed both papers and started stamping.  So what do you think?

 
And all I did for the inside is stamp the beach looking shrubs.  You would think since I live at the beach, I would know what they are called, wouldn't you?

 
Thanks for stopping by and looking today.  I was motivated on Saturday and hope it helps to motivate you.  Enjoy your week.

Monday, March 17, 2014

Sketch 306- Monday Lunchtime Sketch

Happy Monday everyone!  Had my daughter home this weekend and had a blast with my grandson.  What a sweetie he is and definitely a 1 year old for sure.  Got a lot of hugs and kisses which were just wonderful.  Nothing like being a Grammy!!!!
 
Well I just love the sketch that Mary Jo has given us this week to work on.  I think you will also.  So here is my sample for this weeks sketch.
 
 
I did use the Paper Piecing Technique on this card.  I stamped the stamp onto designer series paper and then cut it out.  I love how each vase is just a little different which makes each one unique.  And, I also love this designer series paper called "Venetian Romance."  And, this stamp set, "Vivid Vases," is just beautiful.  There is so many different ways to use this stamp set.
 
Here is a side view of the card!
 
 
You can see the dimension of the layers of the card.
 
Now don't forget to stop by Mary Jo's blog today and check out all of the DT team's samples.  There are some beautiful samples over there.
 
Well thanks for stopping by today and hope your day is filled with many blessings.
 

Thursday, November 7, 2013

Post 10 Craft Show

 
Happy Thursday to everyone.  Here is another card that I made packs of 6 and was so easy to make.  I did the faux tearing technique here. 
  • I took a piece of card stock and tore it and then placed it over the white where I wanted the top scene to end. 
  • I took the brayer using Baja Breeze here and ran it over the white (You can also sponge it if you would like). 
  • I stamped the tree in stazon black ink and removed the torn card stock. 
That is all there is to it.  So easy.  Now on this one, I used the Dazzling Details by Stampin' Up! to make the area between the white and the top shimmer and added snow flakes through out the top.  Here you can see a little more of the detail.
 
 
And here a little closer!
 
 
Side view!
 
 
Here is where I got my idea for this and am uncertain if she actually tore her paper or not.
 
Thanks for stopping by and please leave me a comment on what you think.


Friday, June 21, 2013

Clean & Simple Card Set

I have made quite a few set of cards for our Gateway Landing Open house on Sunday and thought I would share another set with you today.  This is a set I made especially for men and I am quite happy with the way they turned out.  I actually saw this set on Pinterest and cased the layout of it because I knew it would be easy and quick - CAS - that is what I am talking about!  Narelle Jones, the person I cased, did color her images, but I did not have time, so I just left them stamped and sponged the background before stamping the image.  You can find Narelle's here!  One more thing, all of my sets contain 5 cards, so I had to add one extra and decided to add the motorcycle stamp.  So here they are!
 
 
And here they are separately!


Items Used:
Stamp Sets: Need For Speed, Motorcycle
Card Stock: Not Quite Navy, Basic Black, Whisper White
Ink: Stazon Black, Not Quite Navy
Sponge for the Sponging Technique
 
Thanks for stopping by!


Tuesday, May 28, 2013

By the Seashore - CAS

 
Good Tuesday Morning to everyone.  I am back with another clean and simple card using the stamp set "By the Seashore."  I am loving this stamp set and especially since we have entered the beach time again.  This card was inspired by yet another blog for clean and simple called CAS(E) this Sketch.  I decided to use this stamp set as soon as I saw the sketch.  I also used the cloud embossing folder. 
 
Now let me tell you what I did with the shells.  I embossed them with white embossing powder and once embossed, I went over them with the crumb cake marker.  I then took a paper towel and brushed the excess crumb cake color off the embossing and it left just enough of the crumb cake in between the embossing to give it this effect.  Don't you just love it.  I cut them out and then popped them up with a pop dot.  I also took a sponge and sponged around the clouds with Baja Breeze and sponged around the sentiment with crumb cake.  I spritzed the crumb cake at the bottom with the Log Cabin Smooch Spritz to give it a sand look.
 
Here is a side view of the card!
 
 
And, yes the inside is decorated also.
 
 
The stamp set on the top is one of "Our Daily Bread" stamps called Footprints in the Sand.  I stamped the bottom with another shell from the set "By the Seashore."
 
All items used are Stampin' Up! Except inside stamp noted above!
 
Stamp Sets: By the Seashore, Embellished Events, (ODBD) Footprints in the Sand.
Card Stock: Bashful Blue, Whisper White, Crumb Cake
Ink: Bashful Blue, Crumb Cake, Versamark
White embossing powder
Cloud embossing folder
Banner Framelits
Crumb Cake Marker
Log Cabin Smooch Spritz
 
Thanks for stopping by today and hope you have a wonderful day!

Monday, May 27, 2013

TSSC265 Challenge

Good Monday morning and Happy Memorial Day all! Hope you had a wonderful weekend and hope this holiday is wonderful.  First let me remind you that our LNS challenge is now going for two weeks and if you are looking for that challenge, see this post!  This card of course was inspired by this weeks sketch over at Techno Stampers.  Please join us this week for this fabulous sketch.  Since today kicks off our beach season here in Wilmington, NC, I thought I would use the seashells that we have. I just love them.  What I did here was to used the embossing technique two ways.  I used heat embossing on the sentiment and the shells and of course used the perfect polka dots embossing folder for the background.  Here is my sample!


Here is a close up of the embossed shells and sentiment!


A close up side view!


And a side view of the card!


And the inside of the card!


Lots of photos this time as I was having fun with this card!

All items used are Stampin' Up!
Stamp Sets: By the Seashore, Apothecary Art (outside sentiment), Create A Cupcake (inside sentiment)
Card Stock: Whisper White, Pool Party, Crumb Cake
Designer Series paper: Comfort Cafe
Ink: Pool Party, Versamark
Pool Party Embossing powder
Perfect Polka Dots embossing folder
Shimmer Spritz for sand effect

Thanks for stopping by and hope you play along with our Monday Lunch Time sketch this week!

Wednesday, March 6, 2013

Easter Card - He is Risen!


I just love this stamp set as it says exactly what it needs to say and comes with these adorable flowers also.  And it helped a lot on how I was going to do this card when I saw the challenge over at Sunny Challenges and Creations on Monday which included a sketch with the theme of Easter.  So I decided to use every stamp in the set.  I stamped the flowers quite a few times as you can see.  I colored them in by using three different markers - Pink Pirouette, Pretty in Pink and Regal Rose.  I colored the stems with Certainly Celery and Wild Wasabi. Once done with that, I sponged over the images all three colors and then stamped the sentiment at the top in Regal Rose.  So that is how I created the one panel with the flowers.  The rest is pretty simple.

Here is a side view of the card!


On the inside, I used the last stamp with this set which says, "Wishing you an Easter filled with His Love!"  I did not get a photo, but what a great way to use this stamp set.

Thanks for stopping by and hope you have a wonderful and blessed day!

Friday, October 26, 2012

SU LateNightStampers Challenge/Mosaic

 
This weeks challenge at LNS is to do a Mosaic background.  So I used the tutorial at Splitcoaststampers for the faux torn mosaic.  You can find the tutorial here!  It was really easy and after I finished with the technique, I then used glitter and the glue pen to add glitter all around the torn mosaic.  Isn't it just so glittery!  Now what inspired this card was actually the sketch from last Friday at Sketch Frenzy Friday!  I tried to get this done all week and finally finished it last night.  So I guess I am a little late in completing it.
 
Here is a side view of the card!
 
 
You can see a lot more of the glitter from the side view.  Here is a close up!
 
 
Love it and now for the inside which is kind of plain!
 
 
Well that is my card and hope you like it.
 
All items used are Stampin' Up!
Stamp Set: Sounding Joy (retired)
Card Stock: Very Vanilla, Glitter Paper
Designer Series Paper: Festival of Prints
Labels Collection Labels
Snowflake #5 die
glue pen
Silver embossing powder
glitter
 
Thanks for looking today and hope you have a great weekend.

Monday, September 24, 2012

SU LateNightStamper Challenge/Tear that Paper

This weeks challenge over at SU LateNightStampers is to use the tearing your paper technique.  I love this technique but quite often forget to use it until something like this comes up.  So I went kind of easy and simple with this card.  The hard part was the coloring which I used the ink pad and a blender pen for that which is another technique all on its own.  And then used even another technique of sponging which I love also.  So here is what I came up with.
 
 
Here is a side view of the card!
 
 
And of course I can not forget the to work on the inside also!
 
 
So now it is your turn so get that paper out and start tearing.  It is really easier than what you think.
 
All items used are Stampin' Up!
Stamp Set: Bells & Boughs, Word Play, Many Merry Messages
Card Stock: Always Artichoke, Very Vanilla
Ink: Cherry Cobbler, Always Artichoke
Ribbon: Cherry Cobbler 1/2" Seam Binding
Blender Pen
Sponge
Markers for berries on the inside
 
Thanks for looking and hope you have a wonderful rest of the day!


Thursday, September 13, 2012

Another One Layer Card - WOW for LNS


Good Morning and hope your week has been blessed.  Today I want to share with you another one layer card and another technique I learned.  It is called "Embossing with Framelits."  You can find a video here as to the layering and how to emboss.  I just love the look of it and thought about adding ribbon or something but it seemed to take away from the finished product, so I kept taking it off and just left it as is.

Here is a close up of the embossing!


And a side view!


Isn't it the neatest. I have been wanting to do it for a while and finally decided to go for it this week.

And actually since I used the white natural paper, I decided to do the inside, but did not add the layering to the bottom inside.  Here is the inside.


All items used are Stampin' Up!
Stamp set: Apothecary Art
Card Stock: Naturals White
Designer Series Paper: Festival of Prints paper stack
Ink: Early Espresso, Raspberry Ripple
Labels Collection Framelits
Markers for Coloring

Thanks for stopping by!

Tuesday, September 11, 2012

SU LateNightStampers Challenge/One layer card WOW


Our Challenge this week at SU LateNightStampers is to create a card that is one layer but has a technique that give it a WOW! So I decided to use the new Holiday Frame Textured Impressions Folder along with some of the new Tulle Ribbon.  And, what really makes it pop is I also used the Brushed Gold Card stock which is a heavier card stock than our "everyday" card stock.  Really the only time I have used it is at Christmas and I do really like it a lot.

Here is a side view of the card!


So you can still see that I decorated the inside of the card.

And, here is the inside!


This new paper pack had a piece of Designer Paper that matched perfectly the brushed gold card stock.  Love it!

All items used are Stampin' Up!
Stamp Sets: Joyous Celebrations, Holy Family (sentiment inside - retired)
Card Stock: Brushed Gold, Very Vanilla (inside)
Designer Series Paper: Festival of Prints Paper Stack
Ink: Cherry Cobbler, Versamark
Gold embossing powder
Extra Large Oval Punch
Cherry Cobbler Tulle Ribbon

Thanks for looking and let us see your cards with one layer and a WOW!

Wednesday, September 5, 2012

Triple Layer Stamping


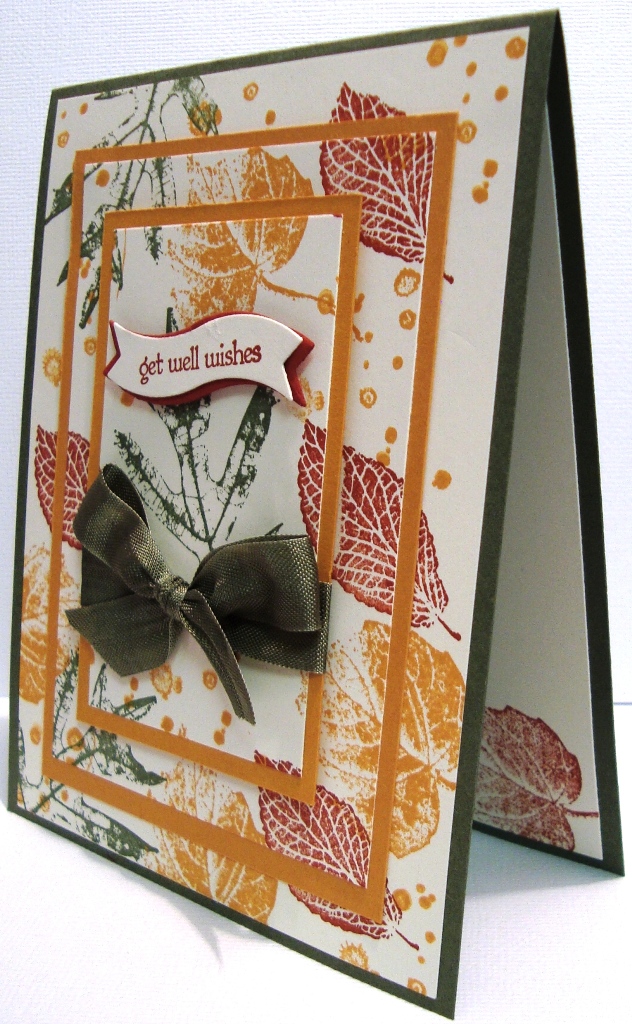
Isn't this just the coolest technique and one I love doing.  Actually here is a video of how you can do this wonderful card using whatever stamp you would like!  So easy and really so quick.  I wanted to go fall since this week's challenge with LateNightStampers is to "Fall into stamping."  This is actually my third post this week with a fall card.  But with each one, I have used a sentiment that could be used at anytime.  With this one, get well as I would like to send this to a lady in our church who has been out a while sick.

Here is the side view!


And the inside of the card!


All Items Used are Stampin' Up!
Stamp Sets: Teeny Tiny Wishes (outside), Curvy Verses (inside-retired), French Foliage
Card Stock: Always Artichoke, More Mustard, Very Vanilla
Ink: Always Artichoke, More Mustard, Cajun Craze
Always Artichoke Seam binding ribbon
Bitty Banner Framelits

So glad you stopped by today and I would love to hear what you think! Enjoy your day!

Monday, September 3, 2012

SU LateNightStamper's Challenge/FALL into Stamping


This week's challenge with our LateNightStampers group is Fall!  Well I got the wheel before the cart or is that the cart before the wheel, anyway, I have been doing Christmas cards.  So it was refreshing to be able to pull out this die and this stamp set I got back in July.  I had been wanting to use it, so when I saw the sketch this week over at Stamping 411, I kept thinking until I finally figured out how I was going to use it. (Also, I was sad to see that Stamping 411 will be taking a break, but I know it is much needed for them and I hope to see them back soon.) I think the card worked out very well, as I love the outcome.  I also love stamping on card stock to make my own design paper which is a wonderful technique.  So easy to just take certain stamps and stamp all over paper using the colors that best suit the card.

Here is a side view!


and yes, I did the inside!


All items used are Stampin' Up!
Stamp Sets: Wonderfall (stamping the card stock and inside bottom), Blessings from Heaven (both outside and inside sentiment)
Card Stock: Cajun Craze, Always Artichoke, More Mustard, Very Vanilla
Ink: Cajun Craze, Always Artichoke, More Mustard
Markers
Button from Button Pack
Early Espresso Baker's Twine
Autumn Accents Bigz Die

Thanks for looking and hope you have a very blessed day!


Monday, August 27, 2012

Lean On Me Stamp Set


Well it took me all day Saturday to get this card done as I was not feeling good and on top of all that, I had to bake some cookies for a bake sale.  But I managed to get it done along with everything else I had to get done.  This is a sketch that was used on Stampin Fun and Friends.  It has been a blast being with them this session and I have learned a lot.  I did the paper piecing technique on the dress and I just love doing that.

Here is the side view!


And the inside!


Just so bright and cheery to me.

All items used are Stampin' Up!
Stamp Set: Lean on Me
Card Stock: Whisper White, Riding Hood Red, Island Indigo
Designer Series Paper: Twitterpated
Fancy Fan Embossing Folder
Markers for coloring

Thanks for stopping by and hope you have a wonderful week!

Saturday, August 4, 2012

Happy Birthday Party Nathan!


Today is Nathan's birthday party even though his birthday was last Sunday, so I thought I would share the card I made for him today!  I thought it turned out so well and was very happy with it.  I actually saw one similar to this on another website which you can find here and just added to it.

Now here is a side view of the card!


I cut out the truck and popped it up.  Gave it a little more dimension that way.

And of course I had to do the inside!


All items used are Stampin' Up!
Stamp Set: I dig you
Card Stock: Bashful Blue, Cajun Craze, Daffodil Delight, Chocolate Chip
Ink: Cajun Craze
Markers for coloring the vehicles.
1 1/4" round punch, scallop round punch
Brads
Tearing technique was used.

Thanks for looking and I need to get busy as I have people coming to my house today for the Birthday Party.

More to share on that later!