Showing posts with label Gift Ideas. Show all posts

Thursday, January 1, 2015

Happy New Year Gifts

Happy New Year to all of you out there this morning.  What a beautiful day it is here in Wilmington, NC.  Skies are Carolina blue and we have some beautiful sunshine right now along with high in the 50's today.  Just love it.
 
I wanted to share with you today some Gifts I will be giving my co-workers when I return back to work.  I will not tell you what is in them as some of my co-workers do follow me.  But I made these cute little bags with the Trim the Tree Designer Paper Stack from Stampin' Up!  I have more to make so they will be in different colors.
 
 
Here is a close up of one of them.
 
 
One sheet of the 4 1/2 X 6 1/2 makes this little bag.  You gotta love it.
 
Thanks for stopping by today and hope you have a wonderful and blessed year.
 

Thursday, December 20, 2012

SU LateNightStampers Challenge / Make an Ornament

This weeks challenge over at our LateNightStampers group is to create an ornament.  That is exciting to me as I started one back before Thanksgiving with the Stocking Die and never completed it and I needed three of them.  So what did I do Monday Evening.  I got to work and finished the first one and made two more.  This is the second one I made and decided to use it first to show it without the goodies in it.  I used last years Christmas Paper from Stampin' Up! as I felt it was very Masculine.  Actually I used last years paper on all of them.  Hope that is OK!
 
 
Now here is the same stocking with the goodies added!
 
 
How cool is that!  I hope my little Nathan just loves it!  And here is the one I made his sister which was the first one I made.  I also used some mod podge on it to seal it, but decided not to do the other two and bought a sealant spray for paper which seemed to work better.  Now the one with the mod podge may hold up better.  We will see!
 
 
And here is the last one for my oldest granddaughter!
 
 
With this one I used the glimmer paper and then cut out a flower from the designer paper to used as the accent on the top.  The names for all of the stocking were did in My Digital Studio and printed out and then I cut them out.
 
Thanks for stopping by today and hope you have a wonderful Thursday!


Tuesday, November 13, 2012

SULateNightStampers Challenge / Christmas Giftables


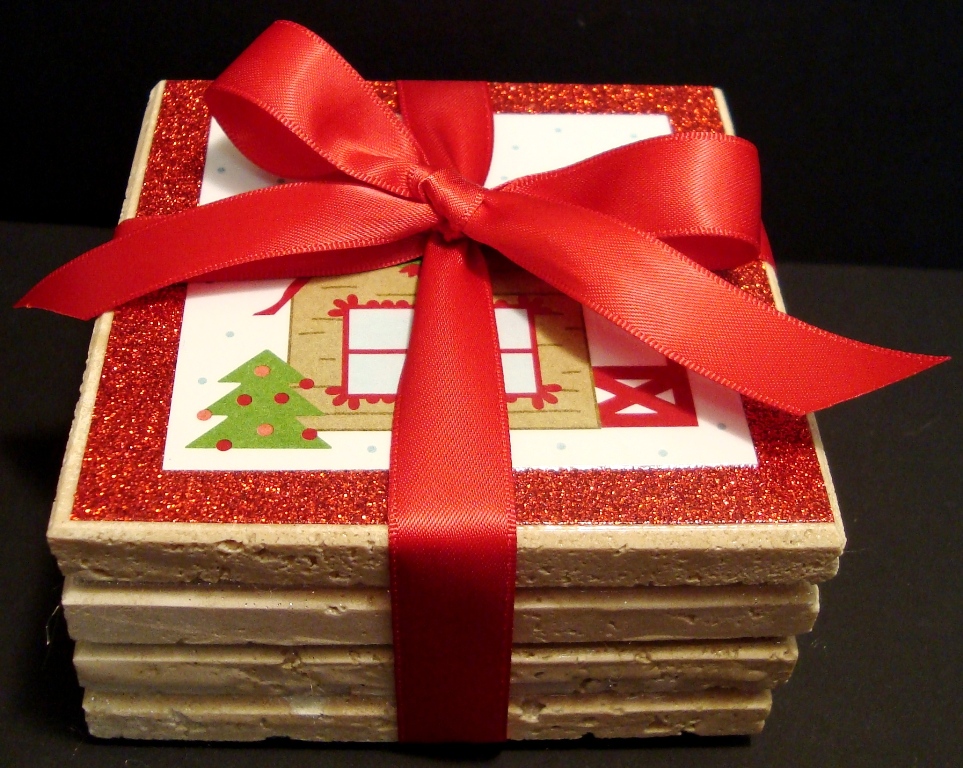
Our challenge this week at SULateNightStampers is Giftables!  It can be quick and easy or as extravagant as you want.  So I decided to put together these cute little coasters.  I bought the tiles from either Home Depot or Lowes for very little. 

I started by putting a coat of Modge Podge on them and attached our Stampin' Up! glitter paper. I put another layer of modge podge over that and then cut out the center scenes from Stampin' Up!'s designer paper "Snow Festival" which I love and again covered that in Modge Podge and let dry.  After it dried, I put three separate spray coats of sealer on top letting each coat dry before the last. (I used the glossy sealer and know some use the matte sealer)  So in hours it probably did not take even an hour, but actually took me two days to finish the process to get everything dry in between.  But that gives you time to work on other things.  Yea!

Here is the final version of the gift all stacked and ready for giving!


Just what you have always wanted for Christmas, right?  I do love the shimmery look and the outcome.  Thanks for stopping by and please let me know if you have any giftables. I am always in the market for something new.

Monday, November 12, 2012

Baby Shower Gift and Box

One of the ladies I go to church with is having her first grandchild and is a boy!  I did a scrapbook for her to give to her Son and daughter-in-law for the shower and the theme was Noah's Ark.  So I decided to make these cute little picture holders to go along with the theme.  Aren't they just the cutest photo holders?  I was well pleased with how they turned out.  The scrapbook was a big hit also and I still need to post it at some point.


Now here is all three of the photo holders with the card I gave them also.  You can actually see the post of the card here.


And now all boxed up in this cute little decorated box I threw together with retired papers and ribbon.  A wonderful way to get rid of all those papers you have stashed that is retired and what a great way to showcase a baby gift.


All Papers (retired), Ribbon (retired), and Stamps are Stampin' Up!
Stamp Sets: Two by Two (card), Wild about You (giraffe on box stamped and then cut out, retired)
Animals on the photo holders were from a pack of random stickers I had picked up on clearance.
The charm on the box is also a clearance pick up!  Gift box is from Stampin' Up! Kraft Gift Boxes - 4 boxes for $2.95

Thanks for stopping by on this Monday and I should have my SULateNightStampers challenge ready to go tomorrow so stop back by.

Saturday, November 3, 2012

Clean & Simple 4 Card Set


Last Night I made a 4 pack set of cards for a friend of mine who is having a surprise birthday party today.  She loves butterflies and so I did a Happy Birthday, Get Well, and 2 Thinking of you cards.  I also added sentiments to the inside.  I was really pleased with how they turned out, but not so much my photos, but this was a quick take so I could get them wrapped.

Here is one of the cards with the envelope!


And another card by itself!


Each card was made just alike except for a different sentiment added!


The inside of the Get Well Card!


And how they were boxed!


All items used are Stampin' Up!
Stamp Sets: Papillon Potpourri, Love & Sympathy, Teeny Tiny Wishes, Curvy Verses
Card Stock: Very Vanilla, Pool Party
Designer Series Paper: Spice cake (retired)
Scallop Oval Punch
Oval Punch
Dotted Scallop Ribbon Punch
Elegant Butterfly
Markers for flower and leaves

Thanks for looking and hope your Saturday is blessed!


Tuesday, October 9, 2012

Birthday Flip Book/Scrapbook!

I am so excited to be able to say I finally finished my granddaughter's scrapbook for her 7th birthday which was November of last year.  We took her and my other granddaughter to a Taylor Swift Concert and boy did those two kids have a blast along with the other 3 kids that were suppose to be adults.  Yes, my two daughter's and I was just as excited as the girls. lol  The photos we got were really not all that good as lighting was off and most were taken with phones.  But it still is a memory for her to treasure.  Again I used this u-tube video to make the flip book album because Morgan wanted hers to be just like her brother's book.  You can see the first one I made for my grandson here!  Now I am working on my other granddaughter's birthday from May which will be a flip book also. What you do for one, you do for the others, right! But, thank goodness, I am about to catch up.  But only when it is about to start right back over.  And, now another grandson on the way.  Don't know if I can keep up with 4!!!!!

Now, on to the flip book album!  Here is the flip book closed!


Here is the first flip open!


And the tag on the first page open!


Second flip open and see the cute ribbon there.  You will see what it is used for as we flip through the little book.  I love it!


And here it is fully open, but wait until you see these other items flipped!


This part will also flip and is just too cute!


Flipping up this section!


And again!


And again!


And one more time!


Now to start flipping through the little book at the end! Yes, if I had taken more photos, I would not have had to use so many embellishments.  But they are cute!  You get too involved with the concert and forget to take photos.  Yes, I was like a kid also! Too much fun!  I will sit closer next time for sure!


The night before we went to the concert was Morgan's birthday that we all went to. Only the girls were allowed to go to the concert which was 4 hours away!  So I had to add these in at the end.

Also this is the middle of the flip book part! Remember that little ribbon I said was so cute.  This is what it is used for, to keep the book in place!


And then shopping the day after the concert.  What a birthday which lasted 3 days!


Thanks for looking today and hope you will try one of these flip books as they are a lot of fun.

All paper was Stampin' Up! Designer paper was all retired papers that I used.  Some of the embellishments were from a local craft store, and others were just found in my stash.  Used my digital studio for the sayings on some of the pages. And thank you Nancy for the little crochet flowers and little bird that I used on some of the pages.

Thursday, August 16, 2012

Back To School Pencils


Good Morning again and as promised yesterday I am back with something to go into the pencil box.  Here are some cute little pencils that I made using card stock and some of that wonderful sticky strip.  They were so easy to make and my granddaughter's just love them.  A tuturial is coming up, but wanted you to see them first.

Here is another photo of them.


And here they are in that wonderful pencil holder from yesterday!


A wonderful gift for a teacher's desk or for a student don't you think?

Now, I am going to try and do a tutorial if it will let me!

How to make a Flower Burst Pencil Topper

1. Here are the items you
will need to make this
topper!
Paper Cutter
Scissors
Sticky Strip
Card Stock
Pencils


2. I did not think about doing the tutorial until I had already cut my strips. So you will cut 3 pieces of Card Stock or Designer Paper 2" X 4 ½".

3. Cut each strip 1 ¾" with the scissors making sure you leave at least ¼" on
the edge as you see in photo here.

4. Then add the sticky strip to the ¼" side that is not cut. See same photo above!

5. Start by wrapping the first piece around the silver part of the eraser with the fringed part of the card stock up as in photo here!
 
6. This is what it will look like when you finish with the first layer!


7.   Do the same for the next piece except start ¼" below the first layer as in photo!

This is the finished second piece.


8. Repeat step 7 starting ¼" below the Second layer
.


9. By using your fingers or one of the pencils pull the pieces downward to form the flower. You can use the pencil to kind of roll them downward.


Continue with each layer until they are all pointing downward!


Final Result!

10. Place finished Flower Burst Pencils into a pencil holder! How easy is that!


Now it is your turn! And please let me know if you made some Flower Burst Pencils.  I would love to see them and thanks so much for stopping by!


Tuesday, December 21, 2010

First Christmas Ornament and Box

Thought I would share with you the ornament I made for my Grandson's first Christmas and the box to put it in for Christmas.  I had shared earlier the ornaments for my Granddaughters' and you can find that post here, along with the directions for the box.

With this ornament, I printed the picture on SU Velum and then ran it through my xyron to give it the sticky back.  I then adhered it to a piece of window sheet.  The circle was cut using the circle scissor for both the vellum and the window sheet.  I then adhered some glitter to the outer part of the circle and then added the glitter to the inside of the glass ornament for a snowy effect.

The box was made using Baja Breeze card stock and the Candy Cane Lane Designer Series Paper.  I also used the ornament punch and the stamp set Delightful Decorations which was stamped in real red classic ink onto Whisper White card stock.

Here is the Ornament at a closer angle!


And, here is the box a little closer!


Thanks for looking and hope you have a wonderful Tuesday!