Monday, November 18, 2013

Hymn & Scripture Challenge #16 / I Love to Tell the Story!

Hello to all my friends and hope you are having a wonderful Monday.  I have not posted lately as I have been spending time with my brother in the hospital.  He is not doing well at all and every time they can get him pretty much stable, something else comes up.  He is now in IMU and everyday is a struggle.  I only worked one day last week, but am going to try and work this week as I have some dead lines.  Please say a prayer for my brother.  He is a special person, has down syndrome.  We have been blessed to have him with us for 63 years.  The doctor said he has lived a lot longer than his life expectancy, so God has blessed us.  That is one of the reasons "I love to tell the story" of God's greatness and mercy and love.
 
I took my computer with me and had a chance to get this done while waiting to visit my brother.  I just love this hymn and remember singing it often as a young girl.
 
I especially love the first verse as it tells exactly how I feel.
 
I love to tell the story
  Of unseen things above,
Of Jesus and His glory,
  Of Jesus and His love.
I love to tell the story,
  Because I know ’tis true;
It satisfies my longings
  As nothing else can do.
 
When I am reading the Bible there are times that just the reading will comfort me and speak to me as nothing else can do.  Especially during this time in my life.  And, I know that it is true beyond a shadow of a doubt.  And then the third verse really brings it all together.
 
I love to tell the story;
  ’Tis pleasant to repeat
What seems each time I tell it,
  More wonderfully sweet.
I love to tell the story;
  For some have never heard
The message of salvation
  From God’s own holy Word.

To hear Alan Jackson Sing it go here!
 
And here is my page!
 
 
Please check out Patter's wonderful post on this beautiful hymn!
 
My Digital Studio was used to make this Page.  The kit was Birds of a Feather.
 
Thanks for stopping by and hope your week is blessed!

Monday, November 11, 2013

Sketch 288 - Monday Lunchtime Sketch

Happy Monday everyone and welcome to this weeks Monday Lunchtime Sketch.  Now we still have our color challenge going on at our late night stampers blog and would love for you to join us and you can use the sketch that Mary Joe has prepared for us this week.  It is fabulous and I decided to go silver and red and a little flashy!  Love the flashy on this card.  So without further ado, here it is!
 
 
You know I have always hoarded this brushed silver paper by Stampin' Up!, but decided to use it for this card.  The same with the red shimmer paper, but with this card, I put them together and I love it.  And then I embossed the "oh what fun" with red embossing powder.  I love the outcome.  Just beautiful if I must say so myself.
 
Here is a side view.
 
 
And the inside is OK!
 
 
All items used are stampin' up!
Stamp Set: Christmas Messages, Whishing You (inside presents)
Card Stock: Brushed Silver, Whisper White (inside)
Red Shimmer Paper
Ink: Cherry Cobbler
Can't remember the name of the embossing folder as it is no longer available
Silver 1/8" ribbon
 
Thanks for stopping by and have a very blessed day!


Friday, November 8, 2013

Post 11 Craft Show

 
Coasters is one of my favorite things to make now and I have done it quite a few different ways.  But this one was very easy as I used Designer Series Paper and a Bible Verse stamped with Stazon Ink.  I also used this beautiful scalloped Tulle Ribbon by Stampin' Up! (retired) to dress it up.  I have these priced at $6.00.  Does that sound good?
 
As you can see in this photo, I added scripture to two of them and the other just the Designer Paper.
 
 
Here is another set in the same paper, but different scripture.
 
 
And it opened up!
 
 
And another set that I have a couple more made up like.


Hope you enjoyed your visit today. 
 
Paper and ink and Tulle are Stampin' Up!  Scripture is from Our Daily Bread Designs.
 
Thanks for stopping by!

Thursday, November 7, 2013

Post 10 Craft Show

 
Happy Thursday to everyone.  Here is another card that I made packs of 6 and was so easy to make.  I did the faux tearing technique here. 
  • I took a piece of card stock and tore it and then placed it over the white where I wanted the top scene to end. 
  • I took the brayer using Baja Breeze here and ran it over the white (You can also sponge it if you would like). 
  • I stamped the tree in stazon black ink and removed the torn card stock. 
That is all there is to it.  So easy.  Now on this one, I used the Dazzling Details by Stampin' Up! to make the area between the white and the top shimmer and added snow flakes through out the top.  Here you can see a little more of the detail.
 
 
And here a little closer!
 
 
Side view!
 
 
Here is where I got my idea for this and am uncertain if she actually tore her paper or not.
 
Thanks for stopping by and please leave me a comment on what you think.


Wednesday, November 6, 2013

Post 10 Craft Show


I am just loving these cute little gift card holders.  I made them by following a video that Jackie Topa did and you can find it here!  She did a great job designing this wonderful card using the envelope punch board.  I love the way it opens.
 
 
When you open it the gift card lifts up.  Love it!
 
 
Here it is a little more open and the final photo open all the way.
 
 
Isn't it just the cutest.  Please check out the video and you will definitely have to make one.  Can't wait to see how this sales at the craft show.
 
Thanks for looking and hope you all have a wonderful day!


Tuesday, November 5, 2013

Post 9 Craft Show

 
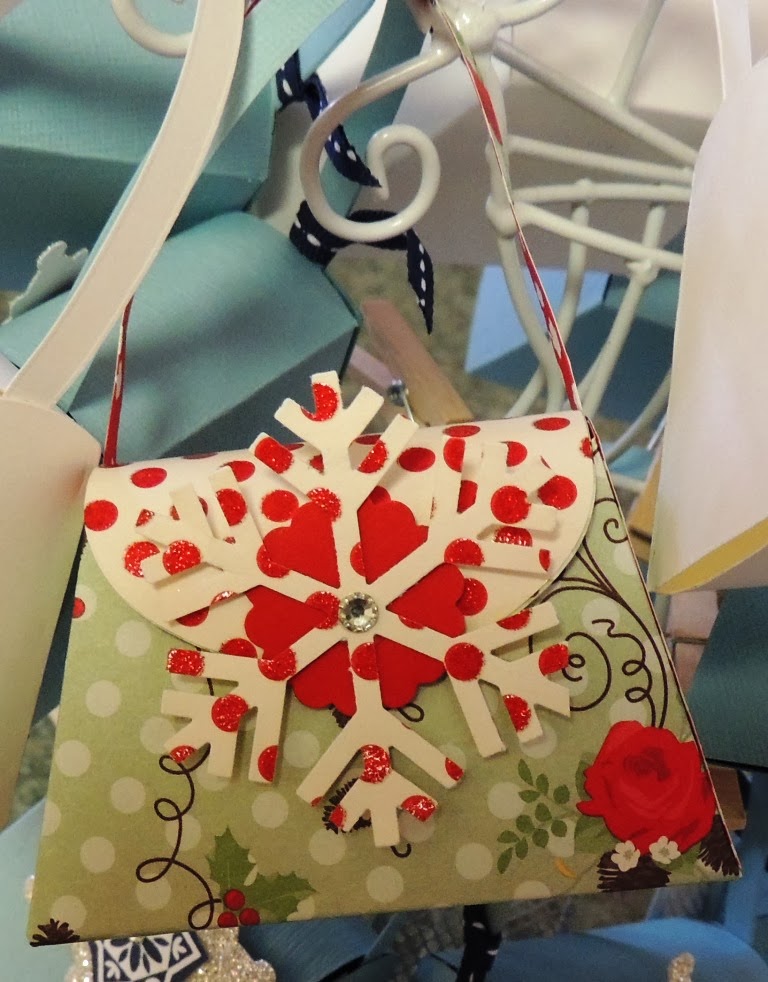
I just love the Petite Purse die that Stampin' Up! has and when I saw this cute snowman on Pinterest,  I just had to try my hand at it.  Debbie Henderson is the author of this one and the one below and you can find the direct link to her site here.  Mine is a little different, but not that much.  I have put four of the Hershey Nuggets inside for a cute gift for kids or adults.  I thought I would also tell them that it would be cute for jewelry or anything like that, don't you think.  I also hung them all on this rack I had and it just worked for displaying them.  Just hope they all stay on there during the transition on Saturday.  Here is another one I made that I saw on PINTEREST.
 
 
This is my favorite and it is just cute.  I love the silver and the Navy together along with the extra Baja breeze card stock I had left.  Turned out great.  And one more purse to share.
 
 
I am enjoying getting rid of all this paper I have from last year and the year before. 
 
Now here is the stand that I have them displayed on.  I will be selling these for $3.00 or maybe $4.00.  Like I said they are holding 4 nuggets each.  Let me know what you think?
 
 
Thanks for stopping by and hope your week is going great.


Monday, November 4, 2013

LNS Challenge 235 / Sketch 287 - Monday Lunchtime Sketch

Good Monday Morning Friends and hope your weekend was blessed.  I am here with you this morning sharing this weeks challenges from Late Night Stampers and of course our Monday Lunchtime Sketch.  Late Night Stampers this week is a color challenge and there are times I have problems with color challenges.  But as soon as I thought of the stamp set Lovely As a Tree, I knew how I could incorporate all four colors and that is exactly what I did. 
 
So here is my sample for this weeks challenges and the colors are Crushed Curry, Tangerine Tango, Cherry Cobbler and Early Espresso.
 
 
And of course the inside of the card.  Can't forget about that.
 
 
All items used are Stampin' Up!
Stamp Sets: Lovely As a Tree, Remembering Your Birthday
Card Stock: Crushed Curry, Whisper White, Tangerine Tango, Cherry Cobbler
Ink: Crushed Curry, Tangerine Tango, Cherry Cobbler, Early Espresso
Scallop Trim Border Punch
Markers for coloring leaves
Sponge Daubers for coloring Tree and Leaf
 
Don't forget to check out the Design Team Samples and add your samples to the Late Night Stampers blog and to the Monday Lunch Time Sketch blog.
 
Thanks for stopping by today and hope your day is blessed!


Sunday, November 3, 2013

Post 8 Craft Show

 
OK, now I am showcasing another one of the gift card holders I will be selling at the craft show.  To make it easy I made all with the little snowman and just different colors.  This little snowman is the cutest and I just love using him.  And the words of the sentiment go so well for a gift card holder. 
 
Here is how it opens and closes!  Just slide the front to the side.
 
 
Makes it easy to use doesn't it?
 
There are a lot of these out there on Pinterest and I also made these last year for my Nieces and Nephews.  So easy!!!  That is what I am all about, cute but easy. lol
 
Hope you all have a wonderful Sunday!  Blessings to all my friends.


Friday, November 1, 2013

Post 7 Craft Show

 
Isn't this just the best card.  I actually found it on pinterest and as soon as I saw it, I knew I was going to case it.  And that I did.  You can see her post here!You can see I just love the gold paper it is on combined with the very vanilla and early espresso card stock.  Makes for an elegant card.  I also love this stamp set.
 
Here is the inside of the card!
 
 
Wonderful sentiment and I packaged it 6 to a box and am contemplating selling this one for $12 a box.  Uncertain as it may be easier to stay with the $10 box for all of the cards.
 
And of course I am packaging them in a clear box.
 
 
Thanks for stopping by and hope you have a wonderful and blessed Friday!


Thursday, October 31, 2013

Project 6 for Craft Show

Well here I am with Post #6 showcasing some of the items for my craft show coming up in 1 week from Saturday.  Hopefully I will have everything done by the end of this weekend.  I would love to, but not sure yet.  So here are some tags I have created and packaged.  I am planning on selling them for $3.00 package, six in each package.  Let me know what you think.
 
 
I took these earlier and for some reason the light was not as good.
 
 
And here is how they will be packaged!
 
 
I have quite a few more to share, but I will share those another day.  The label at top was made using my digital studio and then printed on Whisper white Card Stock.
 
The two stamp sets used here are Stampin' Up and called Winter Post and Bells and Boughs.
 
Thanks for stopping by and hope your day is blessed!


Wednesday, October 30, 2013

Project 5 for Craft Show

Happy Hump Day everyone and welcome to project 5 of my craft show items.  I am going to show you two of the 6 altered composition books that I have turned into a journal, notes, etc. book.  These are very simple and easy which is what I am all about.  First one is black and white which I did a few of these, with a ribbon edge.  Love the black and white!  Wish my photo had been better.
 
 
Now here is one made similar, but a little brighter and the ribbon I made longer to be able to be used as a marker for the page.
 
 
I love this one also.  So bright and cheery.  All of my paper and ribbon are retired.
 
These I will probably put $5.00 on.
 
Thanks for stopping by and hope you have a wonderful day!
 

Tuesday, October 29, 2013

Project 4 for Craft Show

Happy Tuesday to all my friends! Hope your week has started with a bang.  I know lately my everyday starts with a bang.  Seems like I am constantly doing something and I am.  But one thing for sure is I am enjoying putting all the things together for our craft show coming up in less than two weeks now.  But I am pretty much ahead of what I thought I would be. 
 
So here is my 4th project I have for my show.  This is called Snowman Soup.  In each one is one packet of Hot Chocolate mix, two Hershey Kisses and a Candy Cane.  I use the Top Note Die by stampin' Up to make the snowman faces and the top of the hat.  How cute are these?
 
 
Here is what is on the back of the faces!
 
 
You can find this poem and many others ready to print out on a page here!  And I actually got my idea for this Snowman Soup from this blog!
 
And of course one more picture to share!
 
 
Items Used:
SU Top Note Die
SU 1/4" round punch
SU Itty Bitty Shapes Punch  Pack (circle punch)
SU Card Stock: Whisper White, Blue (retired), Basic Black, Cherry Cobbler, Orange
SU Blushing Bride Ink for blush
SU Snow Burst Embossing Folder
 
Now, I am thinking $4.00 on this! What do you think?
 
Thanks for stopping by and hope to have a couple more for you this week!

Monday, October 28, 2013

Sketch 286 - Monday Lunchtime Sketch

Happy Monday Morning and hope all ha a wonderful weekend and ready for a brand new week.  I have stayed busy all weekend with a baby shower, church which I love, and getting ready for the craft show coming up November 9th, so not much down time for me.  But I am enjoying my crafting time.  This is the time I like using up all my retired stuff. 
 
Well on to the challenge!  I love the sketch that Mary Jo gave us for this weeks challenge.  Another card that can be clean and simple which is about all I can handle right now.  And the design team has also done a great job with this sketch.  You will have to go to the Techno Stamper's blog and check out all their samples.  So here is my sample for today's sketch.
 
 
Isn't this just too cute.  I am loving this new stamp set called Christmas Messages.  Now the paper is called Be of Good Cheer from last year.  So it has retired, but I have so many Christmas papers that I just had to pass this year to get rid of what I have.  I have about accomplished that, I think!  I made the tag by cutting a piece of paper 2" by 4 and then using the Apothecary large framelit to cut the top.
 
Here is a look at the side!
 
 
The inside!
 
 
And the envelope and card together.
 
 
All items used are Stampin' Up!
Stamp Set: Christmas Messages (Inside and out)
Card Stock: Very Vanilla, Gumball Green
Designer Series Paper: Be of Good Cheer
Ink: Gumball Green, Cherry Cobbler
Markers for coloring stamp on front
Apothecary Accents Framelit
Adorning Accents Edgelit
Cherry Cobbler Ribbon - retired
 
Thanks so much for stopping by today and hope your week is blessed!


Sunday, October 27, 2013

Baby Card - Stocking Punch

 
Hello all and hope your Sunday has started out well.  I thought I would take a few moments before heading out the door to church and post this card I made yesterday morning for a baby shower yesterday.  I am sure glad these photos turned out well as I don't have the card any longer.  I needed something quick and easy and already had the stocking punch out, so it made it a little easier to make a decision.  I also have a drawer full of retired paper and when I looked into it, this just seemed to pop right out.  So that is what I chose.  It is called Nursery Nest.
 
Here is the inside of the card!
 
 
Love this stamp set called God's Blessings and just pulled it out quickly and stamped the inside.  Took about 20 minutes to throw it together.  Isn't that easy.
 
Items use are all Stampin' Up!
Stamp Sets: Itty Bitty Banners, God's blessings
Card Stock: Whisper White, Marina Mist
Designer Series Paper: Nursery Nest
Ink: Marina Mist
White Baker's Twine
Stocking Punch
Banner Framelits
 
Thanks for stopping by and have a blessed Sunday!


Thursday, October 24, 2013

Project 3 for Bazaar Craft Show

Good Morning and welcome to another cute little project that I have been working on for the craft fair.  This is a giant candy bar holder made with the "envelope punch board."  I am loving that thing!!!!  and the bow was done using the "Gift Bow Bigz L Die."  It was so easy and I got about 15 done in just a matter of an hour.  And, no I did not create this, but again found this tutorial from Remarkably Created blog.  She had a wonderful video on how to do it.  So if you are one of the lucky ones who have received this envelope punch board check out the video by Janet Wakeland.  Now here is what they look like filled and finished.
 
 
Here I took a few of them with the candy bars I put into them.
 
 
And here is the back of the holder with the flap up so you see how to put the candy bar in.  You can seal it or you can just place the flap up under the ribbon so they can use it again if needed.  That is what I did with all of the ones I have made.
 
 
I will probably sell the whole thing for $3.00 since the candy bar cost me $1.50.  Does that sound reasonable?
 
Hope you enjoyed the post and hopefully will have another project to share with you later this week.